
Affiliate disclosure: As an Amazon Associate I earn from qualifying purchases. We may earn a commission when you buy through the shopping links in this guide.
Start with the countertop you will have when the project is finished. For an existing laminate counter and a suitable opening, a drop-in sink is usually the first option to investigate. For a new countertop designed to support an undermount installation, an undermount can provide the exposed counter edge and wipe-in cleanup you want.
The choice affects installation, cleaning and future replacement. Neither style is automatically better for every kitchen. This guide explains the joint, the checks needed for a replacement, and the details to put into an installation quote.
Investigate drop-in first when you want to keep a suitable existing counter, particularly laminate, and the replacement rim can cover and support the existing opening.
Investigate undermount first when a fabricator can confirm that the counter, edge finish and mounting system are suitable, and you prefer an uninterrupted wipe-in edge.
Pause before buying either if the opening, cabinet condition or plumbing clearance has not been checked.
In this guide
- What changes between the two installations?
- If you are keeping the existing countertop
- If you are ordering a new countertop
- Undermount reveal: a small detail with a practical effect
- Cleaning: decide which edge you prefer to maintain
- Compare installation quotes line by line
- Examples after you have chosen the mounting method
- Before ordering: five things to confirm
- Common installation questions
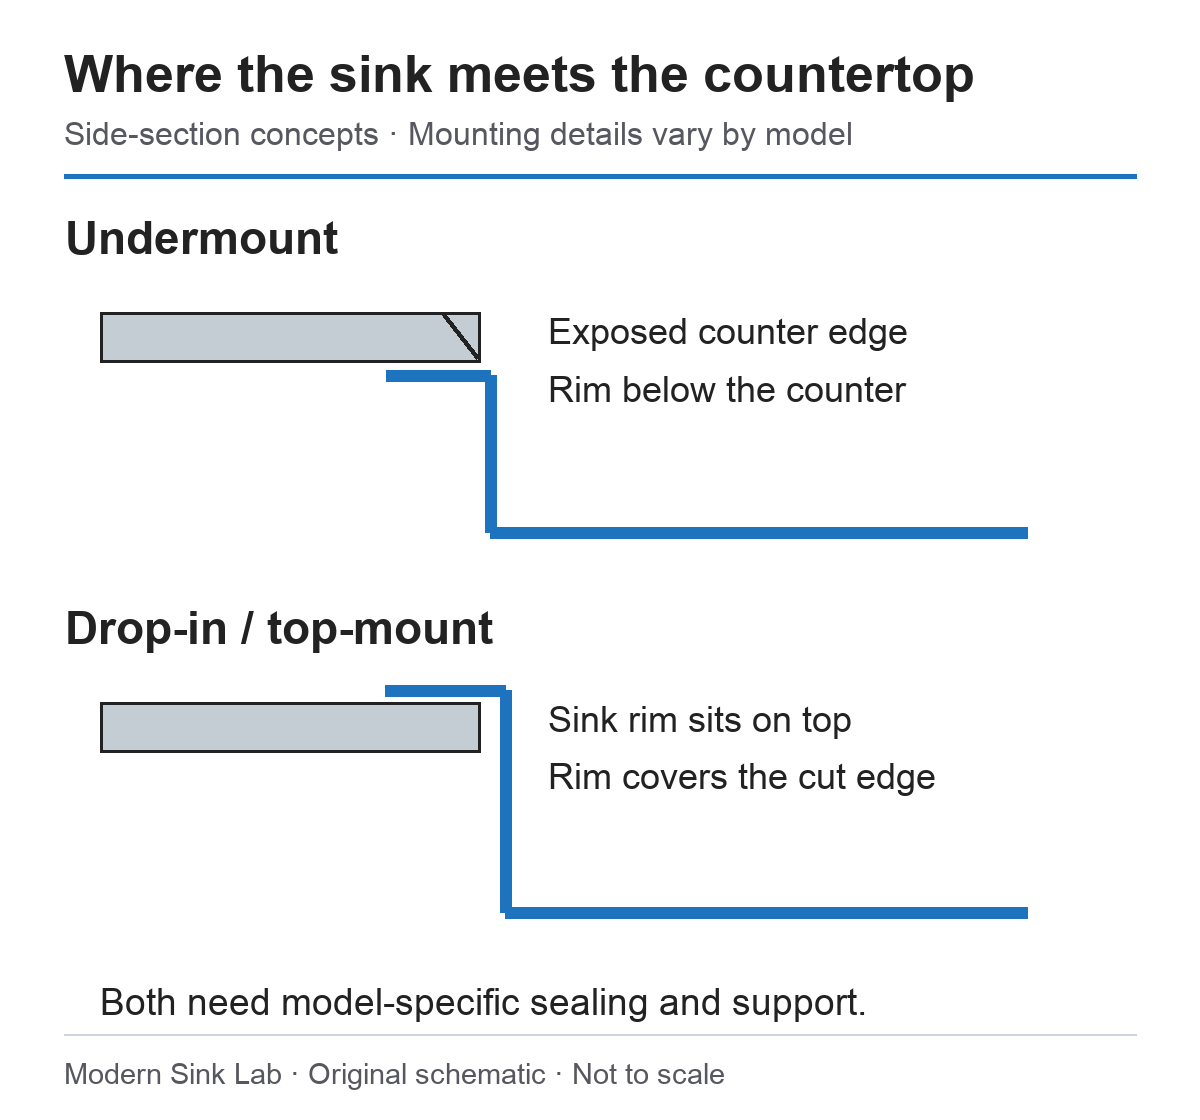
What changes between the two installations?
| Decision point | Undermount | Drop-in / top-mount |
|---|---|---|
| Visible joint | Sink rim sits below the counter; cut edge is exposed | Sink rim rests above the counter and covers the cut edge |
| Counter cleanup | Crumbs and water can be wiped over the edge into the bowl | Raised rim is an extra edge to clean around |
| Existing counter | Opening, edge condition and support need careful review | Can suit a compatible existing opening, including laminate |
| Mounting work | Requires the specified supports/anchors and sealing | Rim, clips or other specified fasteners and sealing still matter |
| Future replacement | Finished opening and access can limit alternatives | Rim coverage can help, but size and corner geometry still constrain fit |
| Costs to compare | Fabrication, edge finishing, support, removal and plumbing | Opening changes, rim fit, removal, fastening and plumbing |
Do not treat “drop-in” as permission to skip mounting hardware or “undermount” as an instruction to rely on adhesive alone. Sink materials and supporting surfaces vary. Follow the complete mounting system specified for the product and countertop.
If you are keeping the existing countertop
The opening you already have sets much of the project. Before shopping, identify the counter material, installed mounting style and condition around the sink. Record the actual cutout if accessible, not just the visible bowl or top rim.
For a drop-in replacement, the new rim must cover the opening with suitable support. A larger outside dimension does not prove enough coverage at every corner. The clips also need space underneath, and the faucet deck must suit the holes and backsplash clearance.
For an undermount replacement, the edge remains visible, so its shape and condition are part of the finished result. Corner radii, bowl shape and reveal can differ even between sinks advertised at the same width. Removal may also affect the existing joint or surrounding material.
Ask for two answers: will this exact sink fit the opening, and can it be installed without compromising the counter? If either answer depends on recutting, repairing or modifying supports, include that work in the quote before purchasing.
What about laminate?
BLANCO explicitly describes drop-in installation as suitable for laminate. That makes it a sensible starting point for a conventional laminate replacement. Do not assume a standard undermount sink can be attached to any laminate counter: the exposed cut edge and mounting arrangement need a system approved for that counter construction.
Specialized solutions may exist, but they are not interchangeable with a generic undermount installation. Obtain confirmation of the exact sink, counter and mounting method before committing. If the existing substrate is damaged or swollen, covering it with a new rim does not repair the material.
If you are ordering a new countertop
Choose the sink early enough for the fabricator’s process. Agree on the model, reveal, faucet holes and support system before the opening is made. The sink’s overall width is not the fabrication dimension, and a drawing for a similar model is not an adequate substitute.
An undermount can give you a clean-looking transition and an easy route for wiping crumbs into the bowl. A drop-in can still be appropriate if you prefer its rim, mounting method or future replacement options. Consider the whole kitchen rather than choosing a style only because it appears in a showroom photograph.
Also plan how the sink will eventually be serviced or removed. The location of supports, plumbing and adjacent appliances can affect access. Future replacement is easier to think about before the countertop is installed than after an inaccessible component fails.
Undermount reveal: a small detail with a practical effect
With a positive reveal, some sink ledge is visible inside the countertop opening. A flush reveal aligns the counter and sink edges. A negative reveal lets the countertop extend over the bowl. Which options are allowed depends on the sink, especially when accessories use an integrated ledge.
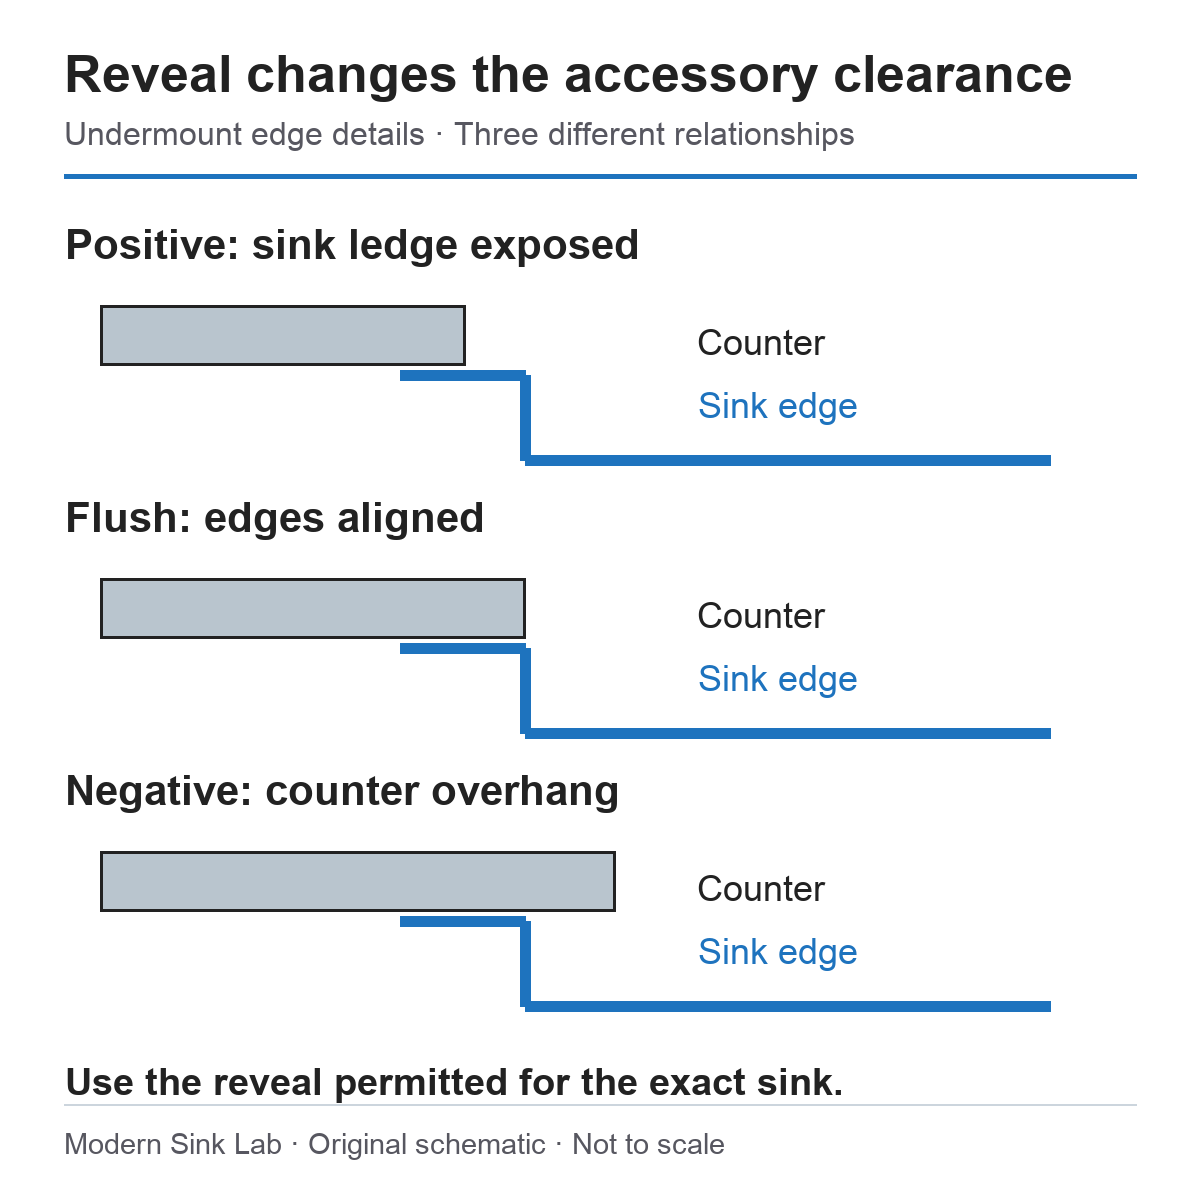
For example, KRAUS advises against a negative reveal for KWU110-32 because it can obstruct workstation accessories. Ruvati’s workstation instructions recommend a ¼-inch positive reveal, allow flush fitting and reject an overhang. These are model-specific constraints, not a universal rule for all undermount sinks.
Ask the installer to dry-fit the actual board, rack or colander with the planned countertop edge. Check whether each can be inserted, moved and removed. A joint can look tidy while still preventing the accessory from working.
Put the reveal decision into the fabrication handoff
Before cutting, have the fabricator identify the chosen template line and check it against the delivered sink and the accessories you intend to use. For an existing countertop, establish whether the current opening can produce that reveal at all; moving the bowl underneath it cannot make an oversized opening smaller.
The positive, zero and negative reveal guide adds edge cross-sections, cleaning-access questions and a handover checklist. Approve a model-specific edge relationship and demonstrate accessory seating rather than relying on an imprecise request for a “small lip.”
Cleaning: decide which edge you prefer to maintain
An undermount removes the raised sink rim from the wiping path, but it does not eliminate the joint. The underside of the counter edge, the sink ledge and the seam still need attention. The reveal you choose changes what is visible and reachable.
A drop-in adds a rim on the work surface. Think about wiping around the faucet deck and the back of the sink, where a narrow gap to the backsplash can make access awkward. Check the actual rim profile rather than assuming all top-mount sinks feel the same.
For either style, follow the product’s cleaning guidance and inspect the joint when you clean. Discoloration, retained debris or a loose component calls for assessment; do not assume adding more sealant over an existing problem addresses its cause.
Compare installation quotes line by line
We do not give a single national installation price because the existing counter, removal difficulty, local labor and plumbing changes can dominate the cost. A useful quote describes what is included and what could change.
| Quote item | What to establish |
|---|---|
| Removal and disposal | Old sink, old seal and responsibility for protecting the counter |
| Countertop work | New opening, recutting, edge finishing or repair, if required |
| Support and fastening | Clips, anchors, rails or other specified mounting components |
| Plumbing | Strainer or disposal connection, trap route, supply work and testing |
| Faucet and accessories | Hole compatibility, backsplash clearance and workstation operation |
| Completion | Required cure time, leak/function checks, cleanup and follow-up |
A cheaper sink can still be the more expensive project if it demands extra counter or plumbing work. Conversely, a higher sink price may be reasonable if the exact model fits the planned installation and includes accessories you need. Compare complete quotes before assigning all of the difference to mounting style.
Examples after you have chosen the mounting method
Undermount workstation: KRAUS KWU110-32
This documented 32 × 19-inch, 16-gauge example requires a 36-inch minimum cabinet and has an integrated workstation ledge. It is worth investigating when the cabinet, counter and reveal are suitable. It is not a drop-in replacement merely because its outside width resembles the old sink.
View KRAUS KWU110-32 on Amazon
Drop-in example: Lordear LTS3322A1
The linked listing is the 33 × 22-inch top-mount example from our original guide. Verify the selected model and mounting option on the merchant page, then check its current template, cabinet requirement, faucet-hole arrangement and rim coverage against your project. Do not use the outside dimensions alone to approve an existing opening.
View Lordear LTS3322A1 on Amazon
These examples illustrate different mounting choices; they are not a controlled performance comparison. For two specific undermount alternatives, read our KRAUS and Ruvati comparison. If thickness is influencing the decision, the 16 versus 18 gauge guide separates gauge from finish and sound treatment.
Before ordering: five things to confirm
- The exact sink and mounting method suit the countertop construction.
- The opening, surrounding material and minimum cabinet requirement have been checked.
- The specified mounting components can be installed and accessed.
- The drain, disposal, faucet and accessories fit the complete layout.
- The quote covers the work needed, and the delivered sink will be inspected before fabrication.
Use the measurement worksheet to collect the details. A confirmed installation plan is a stronger reason to buy than a general claim that one mounting style is more premium.
Common installation questions
Can I convert a drop-in opening to undermount?
Possibly, but the existing opening, countertop construction, edge finish and support determine whether it is practical. Have the fabricator evaluate the specific counter before purchasing a sink.
Can every sink be installed either way?
No. Some models are expressly designed for dual mounting; others are not. Follow the stated options for the exact product.
Is undermount always more expensive?
It can involve additional fabrication and support work, but the complete project determines the price. A drop-in replacement requiring substantial counter or plumbing changes can also be costly.
Which is easier to replace later?
A compatible drop-in rim can provide flexibility, but neither style guarantees a simple future swap. The opening, corner shape, supports and access all matter.
Continue your sink research
- KRAUS Kore KWU110-32 vs Ruvati RVH8300: Which to Buy?
- Kitchen Sink Size Guide for 30-, 33- and 36-Inch Cabinets
- 16 vs 18 Gauge Stainless Steel Sinks: What Matters?
Sources and research method. BLANCO drop-in and undermount installation guidance; KRAUS workstation installation manual and KWU110-32 specification; Ruvati Undermount Workstation installation guide; merchant model information for the linked Lordear example.
Sources checked September 14, 2026. This guide uses AI-assisted research and analysis of documentation; no physical installation or comparative performance testing was performed. Illustrations are original explanatory schematics, not product photographs or fabrication drawings. Model details, seller bundles and warranty terms can change.
Read our editorial policy and affiliate disclosure.
Finish your buying checklist
Once the mounting method is settled, check the bowl and disposal below the counter and the single- or double-bowl layout above it. For an accessory-heavy design, also review the waterfall sink risk checklist.
If you choose undermount installation, check the mounting hardware and adhesive specified in the quote. The rim seal, bowl attachment and countertop compatibility are separate questions; included clips alone do not settle all three.
Keeping an existing countertop needs a more specific check than choosing a mounting style. Use our undermount replacement checklist for the existing cutout and removal route before ordering. Matching the advertised sink width does not establish that its corners, supports or path through the cabinet will fit.
For a wood countertop, plan the butcher block sink cutout, exposed end grain and finish sequence before choosing the mounting style. A covering rim does not eliminate the need to protect the cut edge.