
Affiliate disclosure: We may earn a commission from purchases through paid links. As an Amazon Associate I earn from qualifying purchases.
For a replacement bottom grid, start with the exact sink model and original part number. If those are unavailable, measure the bowl where the grid will sit, including corner shape and drain location—not the sink’s outside width.
First identify which accessory you are replacing
| Accessory | Where it rests | The critical fit |
|---|---|---|
| Bottom grid / rinse grid | On feet near the bowl floor | Footprint, corner radius, feet and drain opening |
| Workstation cutting board | On the sink ledge | Support span, thickness, lip geometry and stability |
| Ledge colander | On ledges or support arms | Support width, depth below ledge and clearance |
| Roll-up drying rack | On ledges or rim, depending on design | Supported span, contact area and rated use |
These products do different jobs. A bottom grid is not designed to bridge the top of the bowl, and a drying rack is not automatically safe as a cutting surface. “Fits a 32-inch sink” leaves out nearly every dimension that decides whether the accessory works.
Look for the sink label under the bowl, the purchase invoice, installation paperwork or a saved product listing. Record the full model and suffix. A family name such as “Kore” or “workstation” is not specific enough to order a replacement grid.
Measure at the grid’s resting height
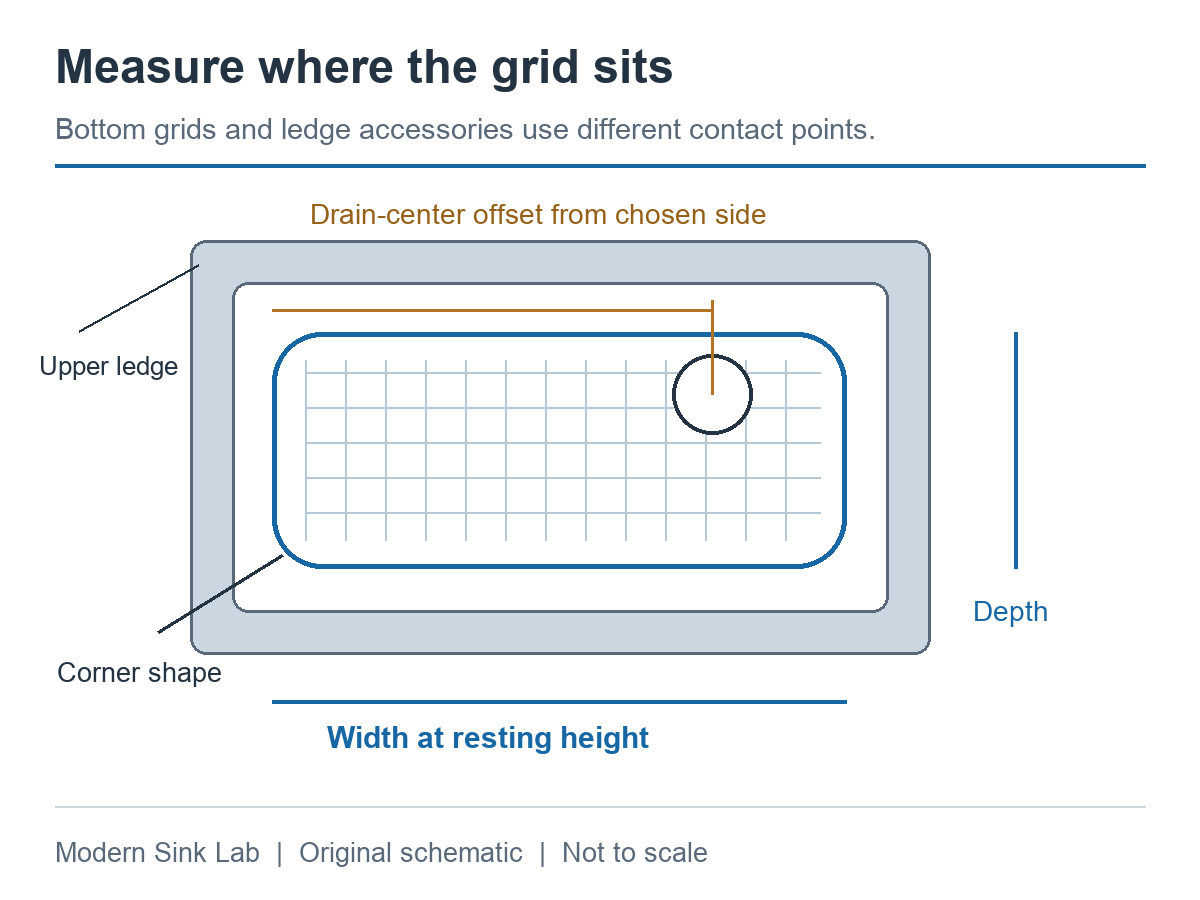
- Remove the existing grid and clean the bowl so the corners and drain are visible.
- Measure left to right and front to back at the level where the replacement feet will support the grid. Tapered walls make top-opening measurements misleading.
- Record the shape of every corner. A square-ended grid can strike a rounded bowl even when its width and depth appear correct.
- Measure from a consistent side and rear reference to the drain center. Note whether the drain is centered, rear-center or offset.
- Inspect protrusions, grooves and the existing feet positions. Check that the drain basket or disposal stopper can be removed through the proposed opening.
Do not apply an automatic “subtract half an inch” rule. Clearance depends on the grid design, feet, bumpers and bowl geometry. Compare your measurements with the accessory drawing and seller’s model compatibility list.
If you have the old grid, measure its outer wire dimensions, corner shape, drain aperture and feet separately. A warped old grid is useful evidence but not an exact template. Photograph the part from directly above alongside a ruler.
Two similar sinks, two different grid part numbers
| Sink model | Grid in reviewed model document | Important distinction |
|---|---|---|
| KRAUS KWU110-32 | KBG-UN1-32 | Rear-offset drain; match the exact sink model |
| Ruvati RVH8300 | RVA68300 | Rear-center drain; a different accessory system |
Both sinks have a documented 32 × 19-inch exterior, yet their original grid part numbers differ. That alone is enough to reject an assumption that all 32-inch workstation grids are interchangeable. Their drain positions also differ.
Use the part numbers above as a starting point for an exact compatibility check, including any superseded replacement number. We are not linking a vaguely similar third-party grid as if it were a confirmed fit. Availability and seller compatibility claims can change.
If you are purchasing a new sink rather than replacing a grid, both reviewed model documents list a bottom grid in the package. Check the selected Amazon bundle before adding another one to the order.
Check KRAUS KWU110-32 on Amazon
Check Ruvati RVH8300 on Amazon
The full KRAUS/Ruvati comparison explains the drain and included-accessory differences. These buttons purchase the sinks, not standalone replacement grids.
Boards and colanders need a different measurement
For a ledge accessory, record the distance between supporting ledges, their usable contact width, their height below the rim, and any countertop overhang. Measure the accessory’s bearing surfaces, not just the widest point shown in a marketing photograph.
An undermount installation can obstruct an otherwise correct board. The KRAUS KWU110-32 specification warns against a negative countertop reveal because it prevents workstation accessories from fitting. If the stone projects over the ledge, buying a second board does not necessarily solve the problem.
Check the working position too. Can a deep colander hang above the grid without interference? Can the board slide past the faucet? Can you lift it out without tilting food into the bowl? These are different questions from whether the part physically spans the opening.
A cutting board must sit securely under the use specified by its manufacturer. Do not improvise spacers or cut away supports to make an almost-fitting part work. Choose a documented compatible accessory or use an independent board on the counter.
OEM, third-party or no grid?
An original or documented replacement is the most straightforward starting point when you can identify the sink model. Confirm that the listing is for the correct part rather than a similarly named sink size.
A third-party grid can be reasonable when the seller provides an actual drawing and explicit compatibility. Ask for the outer dimensions, drain-center offsets, corner radius and feet layout if they are absent. A photograph and the phrase “universal fit” are not enough.
No grid is also an option if you prefer easier access for cleaning and accept direct contact between cookware and the bowl. A grid is not essential to every sink, and it does not make stainless steel scratch-proof. Check your sink’s care instructions and the way you use heavy pans.
Our 16- versus 18-gauge guide separates steel thickness from other ownership issues. Gauge cannot establish accessory compatibility or eliminate scratching.
Check the delivered part before discarding packaging
Place the clean, empty grid gently into the bowl. It should rest on its intended feet without rocking, wedging against the walls or contacting the drain hardware unexpectedly. Check that the bumpers remain between metal surfaces where the design requires them.
Remove and replace the strainer or stopper. Test whether you can lift the grid for cleaning without catching a corner. For a ledge accessory, check the intended movement and stability without loading it beyond the instructions. Stop if the accessory slips, tilts or requires force.
Keep packaging and the part label until those checks pass. If the sink model was listed as compatible but the part does not fit, photograph the interference and contact the seller with the exact model, part number and measurements. Avoid modifying it before resolving return eligibility.
Cleaning and everyday use
Lift the grid regularly rather than only rinsing over it. Clean food residue under the feet and around the drain. Replace damaged feet or bumpers using appropriate parts; exposed contact points can defeat the grid’s intended separation from the bowl.
Follow the care instructions for the grid’s metal, coating and removable parts. Do not assume every rack is dishwasher-safe or every board can be soaked. Allow wooden accessories to dry as directed before storing them in an enclosed cabinet.
Can the model name on the accessory be shorter than the sink name?
Yes, part names can cover several documented compatible models. The important evidence is an explicit match to your full sink model, not whether the names look similar.
Will a rear-center grid work with an offset drain?
Not necessarily. The opening may obstruct the strainer or make cleaning awkward even if the rectangle fits. Compare the drain-center offsets and aperture shape before buying.
Should I buy every accessory in the series?
Buy for a task you actually do and a place you can store it. Our workstation buying guide helps separate useful daily tools from a bundle that mainly adds cleaning and storage work.
How this guide was prepared: Documentary research and editorial planning examples, reviewed September 14, 2026. We have not physically tested these sinks. Dimensions come from the named model documents; examples and drawings are illustrative, not fabrication plans. Sources: KRAUS KWU110-32 specification sheet, original grid KBG-UN1-32; Ruvati RVH8300 specification sheet, original grid RVA68300. Confirm the exact item, included accessories and installation drawing before ordering.
For a model-specific maintenance example, see our KRAUS Dex KA1US33B finish and grid-care guide, which separates the BG3117 grid, ST-4 strainer and covered drain from the sink surface itself.
For a model-specific example, our KBU44 bottom grid and drain planning guide explains why a named replacement grid can be substantially smaller than the bowl opening, and why disposal fit needs a separate check.
Still deciding whether to use a protector? Our sink grid versus sink mat comparison weighs a rigid grid, a silicone mat and a bare bowl by coverage, drain access and the cleaning each adds. Keep a sound existing grid unless a different arrangement solves a specific problem.
11 thoughts on “How to Measure for a Kitchen Sink Grid and Check Accessory Compatibility”